My SSD suddenly became corrupted after a forced shutdown, and now Windows won’t boot and the drive sometimes doesn’t show up in BIOS. I have important files on it that I didn’t fully back up. What are the safest steps or tools to try to repair the SSD and recover as much data as possible before it fails completely?
Sounds like that SSD is choking your whole boot sequence. I had one do the same thing once, froze the board every time it saw SATA power.
Here is what I would still try before you retire it for good:
- Try it over USB
I grabbed a cheap USB to SATA adapter off Amazon and that helped a lot with a dodgy drive I had.
Plug the SSD into:
- a USB to SATA adapter, or
- a 2.5’ external enclosure
When it shows up as a USB device, Windows usually treats it more gently. On SATA, the BIOS and OS both hang when the controller goes nuts. Over USB, the system often keeps running even if the disk is trash.
If the whole PC locks up as soon as you plug it in through USB, that points to a dead controller on the SSD. At that point there is not much to do at home.
- If it shows up, grab SMART data
If Windows recognizes it as a drive at all:
- Open CrystalDiskInfo or a similar tool.
- Check SMART attributes:
- Reallocated sector count
- Pending sectors
- Uncorrectable errors
- Media wearout
On a normal SSD those should be either zero or low. If you see “Bad” status, crazy numbers, or the drive drops offline during the scan, mark it as unsafe.
Run a quick surface test in something like HD Sentinel, not the long destructive one, just enough to see if reads stall or time out.
- Treat it as untrusted even if it “works”
I had an SSD that started acting up, then suddenly behaved fine after a format. A month later it hard-locked mid-game and never came back. Lesson burned in.
If yours:
- mounts over USB
- passes a quick scan
- does not freeze the system during light use
then I would:
- Back up anything on it, if you still care about the data.
- Do a full wipe (secure erase with vendor tool if available, or at least a full format).
- Use it only for non-critical stuff:
- game installs
- download cache
- scratch/temp files
Assume it can die without warning. Do not put OS, work projects, or anything sentimental on it.
- If it hard-freezes the PC even over USB
If every time you hook it up, your system stutters or outright locks, even as a USB device, the controller is probably done.
Power events can corrupt SSD firmware or kill the controller. When that happens:
- BIOS hangs when probing SATA
- OS stalls on any attempt to read SMART
- Sometimes it does not report capacity correctly, or shows as some weird generic device
There are lab services that reflash controllers, but those are priced for data recovery, not for saving a cheap SSD.
Ordering a replacement is the right call. Treat this one as expendable or trash depending on what the USB test shows.
If you drop the exact brand and model (for example “Crucial MX500 500GB” or “Kingston A400 240GB”), I can tell you:
- whether the vendor has a tool worth trying
- if that lineup is known for controller or firmware issues
- whether secure erase or firmware update might give it a short second life as a junk drive
No miracles, but it helps to know if there is a vendor utility before you give it a ceremonial send off.
21 Likes
First thing, stop trying to boot from that drive. Every failed boot is more stress on an already unstable controller.
Here is what I would do, trying to keep data loss risk as low as possible.
-
Treat it as a data source only
- Disconnect it from your motherboard SATA.
- Install Windows on a different drive, or use a Windows PE / WinToGo USB.
- You want your system stable and your corrupted solid state disk used only as a secondary drive.
-
Try different ports and power
- Different SATA port and different power connector.
- Different PC if you have access.
- Avoid constant power cycles. If it fails to detect 2 or 3 times in a row in BIOS, stop and move on to other methods.
-
Check detection order, not only BIOS visibility
- Some flaky drives hang the boot when they sit first in the boot list.
- Go in BIOS, move it to the bottom or disable it as a boot device.
- This sometimes lets the board complete POST, then an OS can still see the drive once booted from another disk or USB.
-
Consider the SSD type and age
- Cheap DRAM‑less SATA solid state disks fail a lot after a few years of heavy writes or repeated hard power offs.
- If it is older TLC or QLC, power loss can corrupt the mapping tables inside the controller.
- Once that table is damaged, every power cycle risks more internal rebuilding.
-
Before DIY repairs, try read‑only data rescue
- Boot from a clean system.
- If the drive shows up even once, do not run CHKDSK first, and do not format.
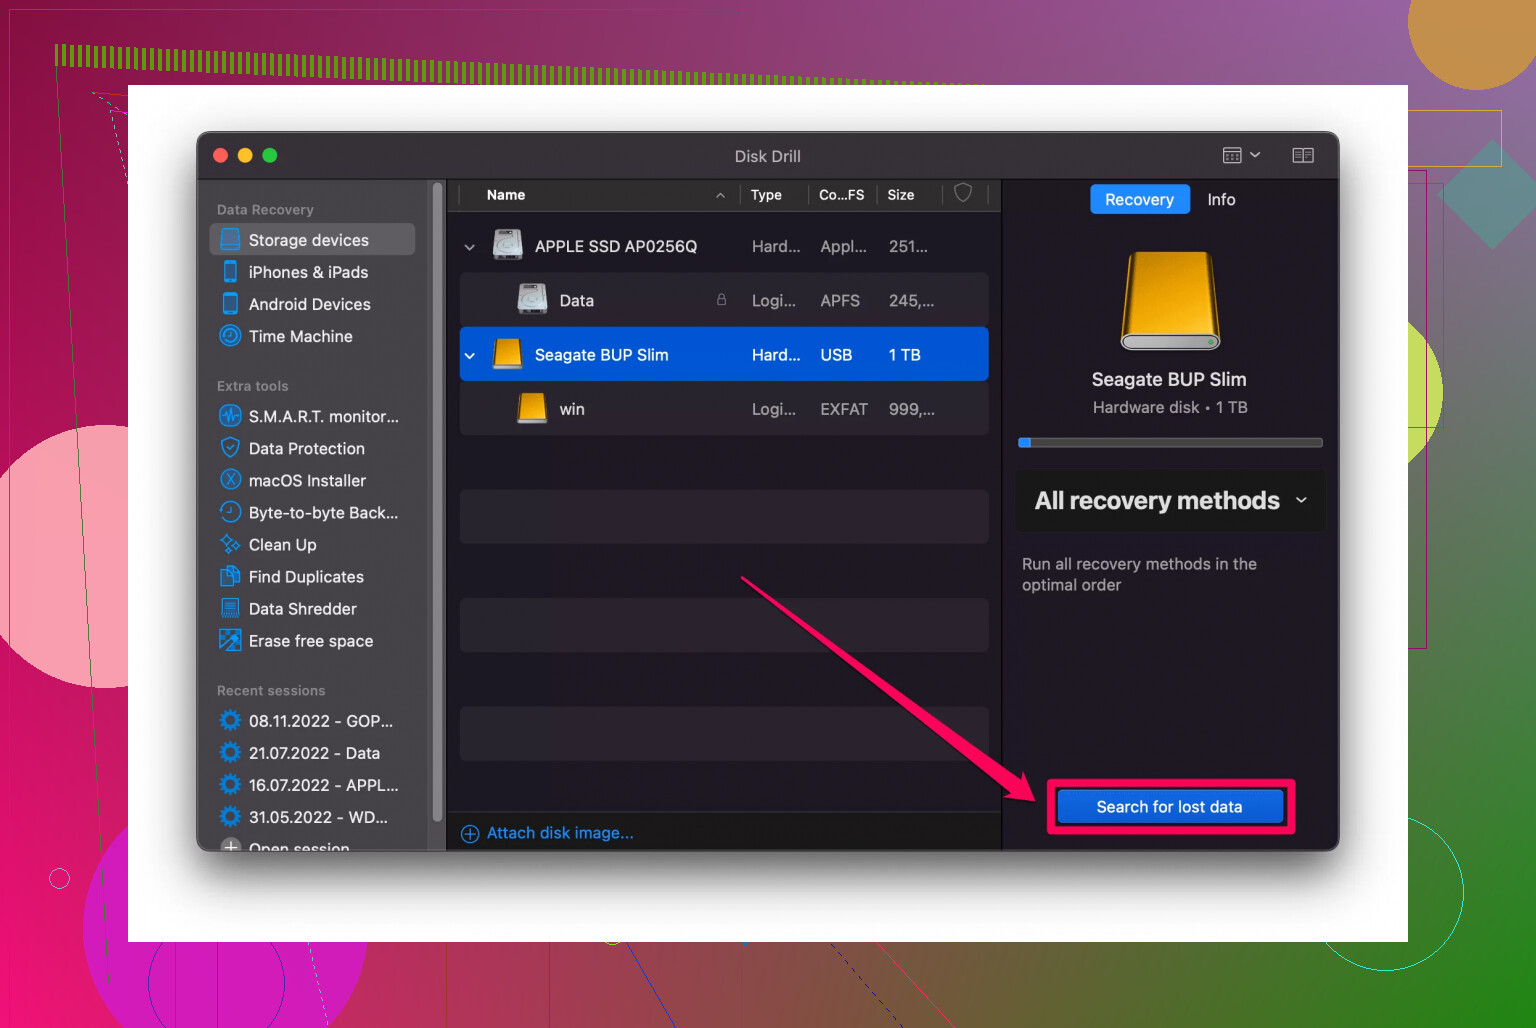
- Use a data recovery app that focuses on read‑only scanning. Disk Drill is a good pick here, since it scans at file system level and also at raw level.
- Point it to the corrupted solid state disk and recover to a different physical disk, never to the same one.
-
Avoid these common mistakes
- Do not run CHKDSK /f or /r on a drive that intermittently drops out. It writes metadata and can trash partially readable file tables.
- Do not attempt secure erase or firmware update before getting data. Those operations wipe internal mapping and will remove whatever remains of your files.
- Do not run multiple tools at once. One recovery session at a time.
-
If the drive drops during copying
- Use software that supports “continue on error” and partial retries.
- Example strategy:
- First, clone the disk to an image file on another drive, using a tool with error‑skipping and timeouts.
- Then run Disk Drill or another recovery tool on the image file, not the failing hardware.
- This isolates the unstable hardware phase to one pass and protects your main system from lockups.
-
When BIOS sometimes shows capacity as 0 GB or weird size
- This often points to controller or firmware trouble, not simple file system corruption.
- In this state, repeated power cycling rarely fixes things. It more often pushes the controller into a worse state.
- If your data has high value, this is the point where a professional lab is the safest path. Home attempts with hot‑plugging and constant reboots reduce the chance of a clean chip‑off recovery.
-
Vendor tools, but only after recovery attempts
- Here I slightly disagree with @mikeappsreviewer on trying wipes or secure erase early. Those are fine if you already gave up on the data.
- Once your files are safe elsewhere, then run the vendor utility, firmware update, and secure erase if you want to see if the drive stabilizes as a non‑critical storage device.
- Treat it as expendable. Use it for game installs or temp stuff, not for OS or important work.
-
About your “SSD” term
- Since you asked about repair and long‑term use too, a quick refresher helps. A solid state drive has no moving parts, stores data in flash cells, and relies heavily on its controller firmware and wear leveling. If you want a clear overview of how these drives behave and fail, check this guide on getting the best reliability and speed from a solid state drive.
- Power loss issues often come from how the controller updates its internal tables, not only from “bad sectors” like in HDDs.
Practical step order for you right now:
- Stop booting from the corrupted solid state drive.
- Boot Windows from another drive or USB.
- Connect the problem drive as secondary, SATA first. If SATA freezes the system every time, then try USB as @mikeappsreviewer suggested.
- If the system stays stable and sees the drive even for a short time, use Disk Drill to scan and copy important files to another physical drive.
- If BIOS frequently fails to see it or reports 0 GB, and data is critical, consider a recovery lab. DIY tricks past this point lower the odds.
- After recovery, wipe, secure erase, and only use that drive for non‑essential stuff, or recycle it if it still behaves badly.
I would not trust a solid state disk that already disappeared from BIOS multiple times for anything important again.
First thing: stop trying to “fix” the SSD before you’ve copied anything off it. Repair comes after recovery, not before.
@mikeappsreviewer and @ombrasilente already covered the physical / connection side really well (USB adapter, different ports, don’t boot from it, etc.). I’ll skip repeating that and focus on what to do once you get the drive to stay visible for a bit.
1. Forget “repair tools” until your files are safe
This is where I slightly disagree with what people often do:
- Do not run:
- CHKDSK /f or /r
- “Repair filesystem” options
- Windows automatic repair that wants to “fix” the disk
- Those love to rewrite metadata and can take a half-readable SSD and turn it into a nicely structured empty one.
Your goal is read only, minimal stress, maximum grab-what-you-can.
2. Prioritize what to copy, not the whole drive
If the SSD shows up even briefly (SATA or USB):
-
Copy critical folders manually first
- Desktop, Documents, Pictures, project folders, financial stuff, etc.
- Don’t start with “I’ll clone the full 1 TB.” If the drive dies mid-clone, you lose time you could’ve spent saving the most important stuff.
-
Only then think about:
- Entire user profile
- Less important media
- Big game folders (yeah, just reinstall those later honestly)
If the drive keeps vanishing during normal copy, move to imaging.
3. Use a disk image so you stop hammering the dying SSD
Here’s where a tool like Disk Drill is actually useful, and not in a marketing way:
-
Create a raw image of the SSD to a healthy drive:
- Use a tool that supports:
- Read only
- Skipping bad sectors
- Timeouts and retries
- Some tools are better at this than standard Windows copy because they don’t freak out on every read error.
- Use a tool that supports:
-
Once you have an image (even if incomplete):
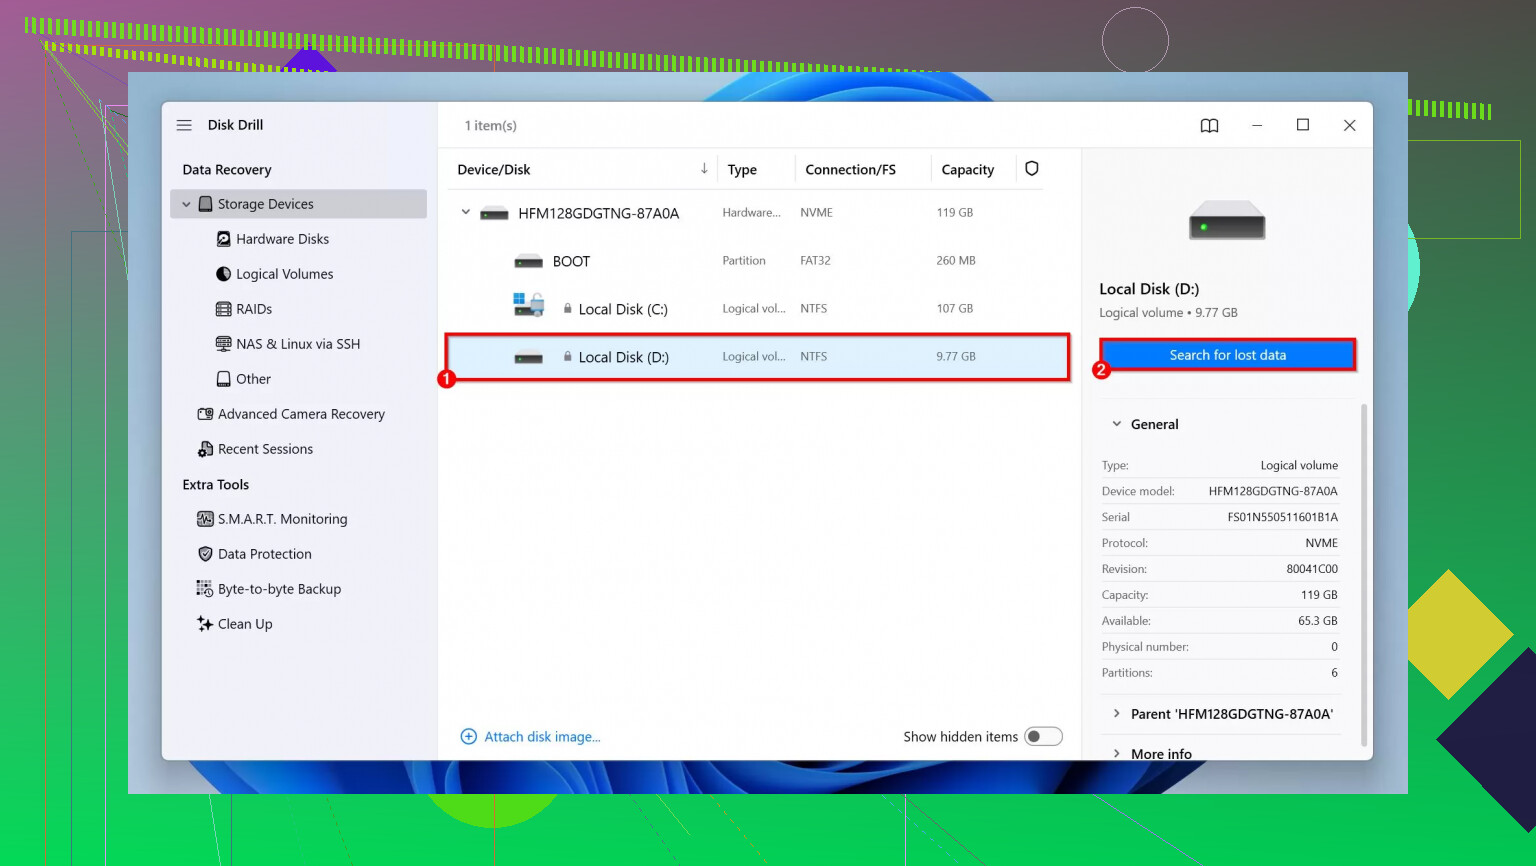
- Run Disk Drill on the image file, not the flaky SSD itself.
- This reduces power cycles and random freezes on the dying drive.
- You can retry scans, pause, filter file types, etc., all without touching the physical SSD again.
This is also where I slightly tilt away from “just back up some files”: in my experience, if the SSD is on its way out, you often only get a few good boots or mounts. Spending that “time budget” to build an image is usually the smartest use of it.
4. Watch for specific failure patterns
You mentioned it sometimes doesn’t show in BIOS and sometimes does. Pay attention to how it fails:
-
Shows correct size, then vanishes during heavy read
- Often flaky NAND / internal mapping issues
- More likely to fail under load, so keep reads short and focused
-
Shows as 0 GB or weird tiny size
- That screams controller / firmware problem
- Every additional reboot and hot-plug starts to be a lottery
If it’s the second case and your data is extremely important, that’s about the line where I’d say professional lab time instead of endless DIY experiments. Home tricks can make eventual chip-off work harder.
5. Only after all that, think about “repairing” the SSD
Once you have your data off:
-
Vendor tools:
- Firmware update
- Secure erase / sanitize
- Full format with surface test
-
Where I disagree slightly with the optimism you sometimes see:
-
If this SSD has:
- Already vanished from BIOS
- Hung the system
- Needed USB to even be seen
Then it belongs strictly in the non-critical / expendable category if you keep it:
- Games
- Downloads
- Temp/scratch
-
I would not put an OS or work data on it again, even if tests say “Good.”
-
Once an SSD’s controller has glitched hard enough to drop the drive like that, trust is gone.
6. Understand what’s actually happening to your data
What most people call “data corruption” on SSDs is usually the controller losing track of what’s mapped where, or partially written metadata. It’s less about scratchy “bad sectors” and more about the controller’s brain getting scrambled after power loss.
If you want a plain-English deep dive into what’s going wrong under the hood, this explainer on
how corrupted files and drives really happen and how to prevent them is actually worth a read. It’ll give you a better idea of why forced shutdowns can wreck SSDs in ugly ways.
7. Practical order for you right now
- Stop booting from the problem SSD entirely.
- Boot from another drive or a Windows USB.
- Connect the SSD as secondary; if SATA keeps freezing, try USB like @mikeappsreviewer suggested.
- If it mounts even briefly:
- Manually copy must-have files first.
- If copies keep failing, switch to making a raw image and then use Disk Drill or similar on that image.
- If BIOS starts showing 0 GB / random sizes, or the PC hard-freezes just from having it plugged in:
- Decide how much the data is worth.
- Either stop DIY and go to a pro lab, or accept that some data is probably gone.
Don’t get seduced by “one-click repair” tools or Windows auto-fix dialogs. In this situation, “repair” usually translates to “overwrite what little is left.”
Short version: stop trying to “fix” the SSD, focus on safely extracting what you can, then decide if it is lab‑level or junk.
A few angles that complement what @ombrasilente, @andarilhonoturno and @mikeappsreviewer already covered:
1. Try a cold, single long session instead of lots of reboots
Everyone’s advising fewer power cycles, which I agree with, but I’d push it further:
- Let the SSD sit powered off for a few hours.
- Then do one careful recovery session where you:
- Power on
- Boot from a clean OS on another drive
- Attach the SSD (SATA or USB, whichever is more stable)
- Work continuously until it drops once, then stop for the day
Constant “try again, maybe this time” reboots can be more damaging than one long, gentle reading session.
2. Start with a logical snapshot, not a full-disk clone
Where I slightly disagree with the pure “always raw-clone first” approach:
If the SSD is flaky but not instantly disappearing, a full raw clone can hammer weak areas and kill it early. In that case:
- Use a file level tool first to grab:
- Your user folders
- Work projects
- Anything small but important (configs, code, documents)
- Only if the drive survives that, move to:
- Partition image
- Finally, full raw image if you still want everything
A full-image-first strategy is perfect for drives that are slow but stable. For yours, which vanishes from BIOS, I would prioritize the highest value data quickly.
3. Disk Drill in the mix: where it fits, pros and cons
Once the drive stays visible long enough for a scan, Disk Drill is a solid option if you use it correctly:
Pros:
- Can scan at file system and raw level, useful when the partition table is mangled.
- Works nicely on disk images so you stop touching the failing SSD.
- Interface is relatively straightforward, which matters when you are under stress and tired.
Cons:
- Deep scans on a dying SSD are heavy. If the drive drops constantly, it may not complete and that time might be better spent copying crucial folders.
- It is not magic: if the controller stops responding or the SSD reports 0 GB, no software, including Disk Drill, can “talk around” that.
- Can tempt you into “one big perfect scan” instead of the more realistic “grab the most important stuff first and accept partial success.”
So I would slot Disk Drill like this:
-
If the partition is still mountable:
- Copy critical stuff manually first.
- If folders are inaccessible or file system looks empty, then let Disk Drill scan, but keep expectations realistic.
-
If the partition is not mountable but the device shows a normal size:
- Create a raw image to another drive.
- Run Disk Drill on the image, not the SSD, which is what @mikeappsreviewer was hinting at with the “one pass then work on the copy” strategy.
4. When all three common paths fail
In practice there are only three ways forward at home:
- Normal file copy
- Logical recovery (like Disk Drill or similar)
- Raw sector imaging plus recovery on the image
If:
- The drive randomly drops from BIOS
- Shows 0 GB or a tiny bogus capacity
- Or hard-freezes the whole machine even over USB
then you are in “controller / firmware failure” territory. Here I am more conservative than some DIY guides: every trick you try on a drive in that state (hot plugging, freezer myths, etc.) can make a professional chip-off job harder or impossible.
So:
- If the data is replaceable or low value: accept defeat and stop burning time.
- If it is critical (legal, business, unique family photos): do not keep experimenting. Look at a reputable recovery lab.
5. How the earlier advice fits together
- @ombrasilente focused strongly on not booting from the SSD and using it only as a secondary source. That is absolutely right and should be step zero.
- @andarilhonoturno emphasized not running CHKDSK or automatic “repairs” before recovery. I agree 100 percent and would add: disable any background antivirus or indexing that might silently start touching the SSD.
- @mikeappsreviewer’s suggestion to try a USB adapter is great because it isolates the drive from your SATA boot path and often keeps the OS from hanging, but if USB connection alone locks the system, stop there. That is your sign that the controller is really gone.
Putting it all in order, with your situation in mind:
- Boot from a different drive or USB.
- Connect the SSD once via the most stable method (SATA or USB).
- If it mounts:
- Manually copy the most important data first.
- Then consider Disk Drill for damaged or missing partitions, ideally working on an image.
- If it does not mount or shows nonsense size:
- Decide between professional lab and writing it off.
- After recovery (if any):
- Secure erase / full test only if you want to reuse it for non‑critical stuff, and accept that it might die again without warning.
No software can “repair” flash cells or a failing controller. All you are really doing is controlling how the remaining readable data is harvested before the SSD gives up for good.