I accidentally deleted photos from my SD card while moving files to my Windows 11 PC, and now the card looks empty. These pictures are really important, and I need help figuring out the best way to recover deleted photos from an SD card on Windows 11 before anything gets overwritten.
I did this to myself once with a camera card full of trip photos, and the first mistake I almost made was keeping the card in the camera. Don’t do that. Pull the SD card out now and leave it alone.
When files get deleted from an SD card, the card usually does not erase the photo or video data right away. What gets removed first is the file record, the part your device uses to find the file. The storage gets marked free, so new data can land on top of the old data. If you keep shooting, you raise the odds of permanent loss. I learned this the hard way.
You’ll need recovery software. Also, skip repair tools like CHKDSK on Windows or First Aid on macOS. Those are for fixing file system issues, not recovering deleted media. On a card with deleted files, they can make recovery worse.

- Use a card reader
Plug the SD card into your computer with a dedicated card reader. I’ve had better results this way than connecting the camera itself. Fewer weird connection drops, fewer permission issues.
- Start with software that lets you preview files
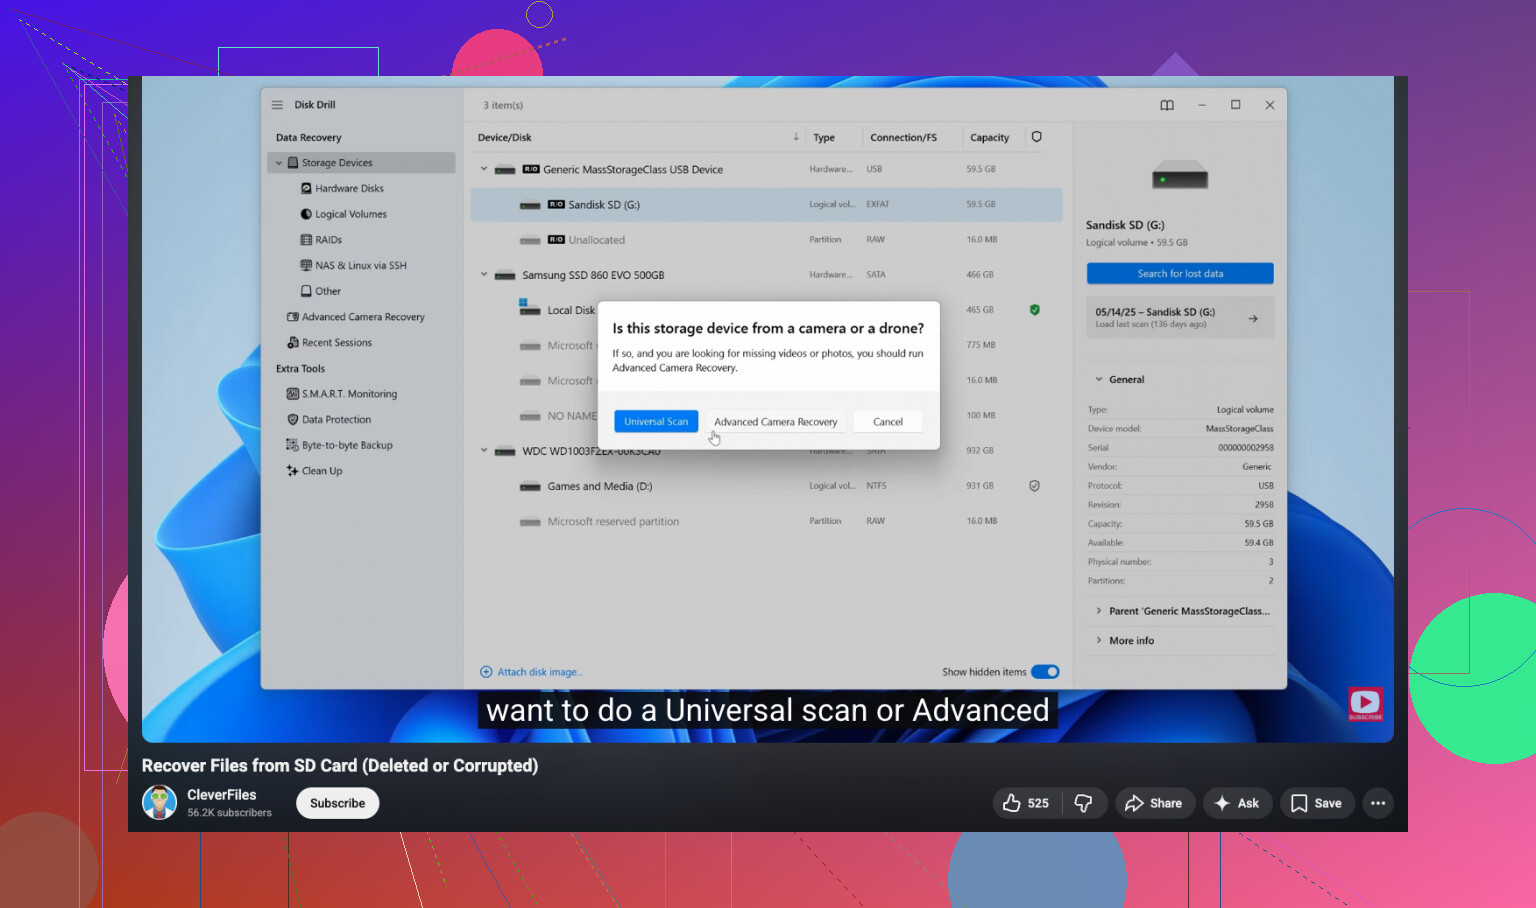
After trying a pile of these over time, I’d start with Disk Drill. On SD cards, it tends to find more than the cheap basic tools. The preview feature matters more than people think. You get to check whether the photos open and whether the clips look intact before saving anything.
This part matters if your deleted files are videos from a GoPro, Canon, DJI drone, or similar gear. Those devices often write video in chunks. Some recovery apps find the chunks but fail to rebuild them into a playable file. Disk Drill has an Advanced Camera Recovery mode aimed at this exact mess. On Windows, the free tier recovers up to 100 MB, so you can test it first and see if your card is still salvageable.
- If you need free, there is one option, but it’s rough
PhotoRec is free and open source. I’ve used it. It works. I also hated sorting the output.
It runs in a text interface. No previews. No original filenames. No folder structure. You end up with a giant pile of recovered files named like they came from 2003, and then you spend an hour or three figuring out what is what. If you care more about cost than convenience, it does the job.
- Tools people mention a lot, with caveats
Recuva gets recommended in old threads all the time. For simple deleted documents, fine. For camera media, especially RAW files, I’ve seen mixed results.
Windows File Recovery is another one people bring up. It’s command line only, and on FAT32 or exFAT cards, which is what most SD cards use, I found it clunky and easy to mess up.
- Recover to a different drive
This is the rule people skip and then regret. Do not save recovered files back onto the same SD card.
When the software asks where to put the recovered files, choose your computer’s internal drive or another external drive. If you write recovered data onto the same card you’re scanning, you risk overwriting the deleted files you were trying to bring back. Yes, mid-recovery. Dumb way to lose stuff twice.
So the short version is this:
Stop using the card.
Use a card reader.
Run recovery software.
Avoid CHKDSK and First Aid.
Save recovered files somewhere else.
If you haven’t shot new photos or video onto the card since the deletion, your odds are usuallly pretty good.
4 Likes
Pull the SD card out and stop using it. That part from @mikeappsreviewer is dead on. Where I differ is this, before running recovery, make a full image of the card if the photos matter a lot. Use USB Image Tool or Win32 Disk Imager and copy the whole card to your PC first. If a scan goes sideways, you still have the source.
On Windows 11, I’d do it like this:
- Check Disk Management. If the card shows the right size, recovery odds are decent.
- Make an image of the SD card.
- Scan the card image, not the card itself.
- Sort results by file type, JPG, PNG, CR2, NEF, ARW, MP4.
- Recover to your PC drive, not the SD card.
Disk Drill is a solid pick here because it handles photo formats well and keeps the process simple. I’d use it over command line stuff unless you like pain.
If the card went empty after a move, not a format, your odds are often better than people think. Also try this video guide for Windows users recovering files from an SD card, step by step SD card photo recovery on Windows.
One more thing, if Windows says the card needs formatting, do not click it. Thats where people make it worse fast.
If the card looks empty right after a move, I actually think there’s a decent chance the photos are still there and Windows just dropped the file entries. @mikeappsreviewer and @cazadordeestrellas already covered the big stuff, so I’ll add the part people forget: check the PC first before going deep into recovery mode.
Sometimes the “move” copied files to your Windows 11 machine, then hid them in some dumb folder path like Pictures, OneDrive, or even the temp import cache. Use Windows Search with *.jpg OR *.png OR *.cr2 OR *.nef and sort by date. Also check Recycle Bin on the PC. SD cards usually bypass it, but the destination side of a move can still leave recoverable traces.
If nothing is there, then yeah, recover from the card or better, from an image of it. I slightly disagree with the idea that everyone needs to start with the most hardcore workflow. If the card is stable and readable, Disk Drill is probly the easiest first pass on Windows 11 because you can filter by file type and preview what’s real before restoring. That saves a ton of time versus digging through a chaos pile.
One more thing people skip: look at file sizes in recovery results. If your JPGs come back as 0 KB or your RAW files are way too small, that usually means partial overwrite. Recover the biggest intact-looking versions first.
And yeah, save everything to your SSD or another drive, not back to the SD card. Also, if you want a fast visual walkthrough, this SD card photo recovery on Windows 11 video guide is easier to follow than most text-only posts.

I’d add one angle the others only touched lightly: check whether the card is failing, not just “deleted.”
If the SD card suddenly shows empty and Windows 11 is slow to open it, asks to scan/fix it, or shows weird capacity numbers, that can mean filesystem damage or a dying card controller. In that case I slightly disagree with doing multiple test runs on the live card. One clean pass is fine, but repeated rescans on flaky media are how recoveries get worse.
What I’d do:
- Open Event Viewer or just watch File Explorer behavior. Freezing, disconnect sounds, or read errors are bad signs.
- If it is unstable, image it once and retire the card after recovery.
- If it is stable, do a normal recovery pass and only then try deeper scans.
Also, check hidden files before anything fancy:
- File Explorer
- View
- Show
- Hidden items
I have seen “empty” SD cards that were just showing hidden/DCIM weirdness after a bad transfer.
On software, @cazadordeestrellas, @waldgeist, and @mikeappsreviewer covered the usual path well. Disk Drill is probably the easiest Windows option if you want previews and support for common photo and RAW formats.
Pros of Disk Drill:
- easy UI
- previews before recovery
- good photo/RAW support
- can scan card images
Cons:
- free recovery limit on Windows is small
- deep scans can take a while
- results still get messy if metadata is damaged
If Disk Drill finds filenames but previews fail, that usually points to overwrite or corruption, not bad recovery software. Recover the largest valid files first to your PC, then verify them before doing more.