My camera suddenly showed a card error during a shoot, and now the SD card looks corrupted. I can’t open the photos or videos, and some important files may not be backed up. I need help figuring out the safest way to recover data from a corrupted SD card without making it worse.
I’ve had SD cards go bad at the worst possible time, right after dumping a long shoot, once after a drone flight, once while moving family photos I did not have backed up yet. First thing, stop using the card. Don’t stick it back in your camera, don’t keep refreshing File Explorer, don’t try random fixes. Every extra write puts your files at more risk.
What I learned the hard way is this: recover the files first, try to repair the card after. A lot of people do the opposite. They run format, repair commands, whatever Windows suggests, and then wonder why recovery gets worse. If the file system is damaged, your files often still exist. The map is broken, not always the data.
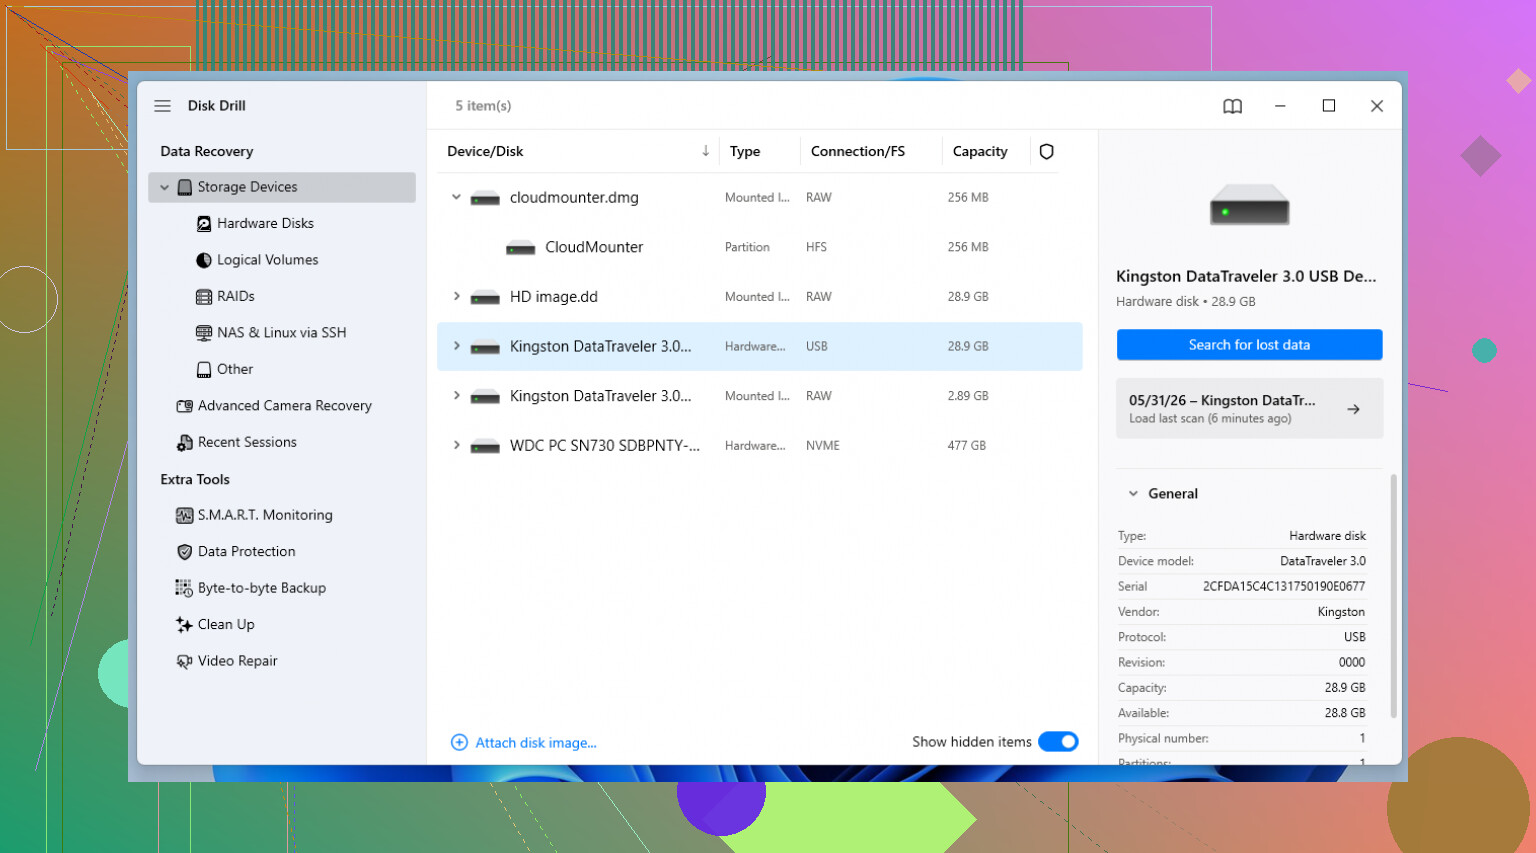
If the stuff on the card matters, I’d start with recovery software instead of repair tools. I’ve had decent results with Disk Drill. The part I liked most was the byte-to-byte backup option. On a flaky card, this matters more than the scan UI or the labels on the buttons.
Here’s why. A corrupted card is sometimes more than 'corrupted.' It might be dying. Scanning it over and over means repeated reads from weak memory cells or a bad controller. Disk Drill lets you make a full image of the card, sector by sector. Save the image to your computer, unplug the SD card, then work from the image file instead. I’ve done this when a card kept disconnecting mid-scan. Way less stress, and I got more back from the image than from the live card.
After recovery, or if you’ve already accepted the loss and want the card usable again, this is the order I’d go in.
1. Check the simple junk first
This part feels dumb until it saves you 20 minutes. Try another USB port. Try a different card reader. Those tiny adapters bundled with microSD cards fail all the time. I’ve had one read fine one day and vanish the next. If you’re using a laptop slot, test with a separate USB reader. Sometimes the card is okay and the reader is the problem.
2. Look in Disk Management
Windows sometimes sees the device but doesn’t mount it cleanly. Right-click Start, open Disk Management, and find the card. If it shows up there but has no drive letter, right-click it and choose Change Drive Letter and Paths. Give it a letter. I’ve seen cards reappear in File Explorer right after this.
3. Try the built-in Windows error check
If the card mounts but acts weird, right-click it in File Explorer, open Properties, go to the Tools tab, and hit Check. This is the mild option. It looks for file system errors and tries to patch them without getting too messy. Sometimes this is enough for cards that were pulled out too fast.
4. Run CHKDSK if the basic repair does nothing
Open Command Prompt or Terminal as Administrator and run chkdsk X: /r, replacing X with the card’s drive letter. The /r switch tells Windows to scan for bad sectors and recover readable data where it can. On large cards this drags. I’ve had 256 GB cards sit there for ages. Let it finish.
5. Use TestDisk if the partition vanished
If the card shows as unallocated, empty, or like the partition disappeared, TestDisk is worth a look. It’s open source and ugly in the old-school utility way, but it does real work. I would only use it if you’re okay reading prompts carefully. It’s one of those tools where patience matters more than speed.
6. Format the card if repair is the only goal now
If none of the repair steps help and you no longer need the files, format the card. Standard format first. If it fails, a low-level format tool is the next move. I usually pick exFAT for SD cards because it plays nicely with big files and most devices read it fine.
One more thing. If an SD card corrupts once, I stop trusting it. Maybe it survives, maybe it doesn’t, but I stop putting anything important on it. Flash memory wears out. Controllers flake out. Cheap cards lie about capacity too. I move suspect cards to throwaway use or recycle them and replace them with something from SanDisk or Kingston.
And yeah, use Eject or Safely Remove. I ignored that for years because I was in a hurry. That bit me more than once. It feels slow until you lose a whole card of files, then it feels cheap.
4 Likes
Yes, recovery is often possible, if you stop touching the card right now.
I agree with @mikeappsreviewer on one big point, recover first. I differ on CHKDSK timing. I would not run CHKDSK early on a camera SD card with missing photos or videos. It is fine for a normal USB drive, but on damaged camera media it sometimes rewrites directory info and leaves RAW or MP4 files harder to rebuild later. That part gets glossed over a lot.
What I’d do:
- Lock the SD card, if it has the write switch.
- Use a good reader, not the camera.
- Try recovery software first. Disk Drill is a solid pick for photos and video, esp if the card still shows up in the system.
- Save recovered files to your computer, never back onto the SD card.
- If videos come back broken, look for tools with video recovery or file repair support. Camera video files often lose the header first.
If the card disconnects, shows 0 bytes, or asks to format, don’t keep retrying for hours. That points to hardware failure, not a simple file system issue.
Also check whether your camera made sidecar or temp files. Sometimes the main image index dies, but the raw data is still there and Disk Drill finds it by signature scan.
For a clean walkthrough, this step by step guide to recover files from a corrupted SD card is worth a look.
If the files are once in a lifetime stuff, wedding, paid shoot, family event, stop DIY after one solid recovery pass and send it to a pro lab. Repeated scans are where people make it worse.
Yep, sometimes you can recover a lot, sometimes almost everything, and sometimes the card is just cooked.
I mostly agree with @mikeappsreviewer and @byteguru on the big rule: don’t keep messing with the card. Where I slightly disagree is with the idea that software is always step one. Before any scan, I’d check the card’s behavior in another reader on another machine just once. Not to ‘fix’ it, just to confirm whether you’re dealing with file system corruption or a reader/camera tantrum. Cameras are dramatic little gremlins.
A few things people forget:
- If the camera can still preview thumbnails, the data may still be there even if the computer can’t mount it right.
- If the card gets unusually hot, disconnects randomly, or reports the wrong capacity, that’s more like hardware failure than simple corruption.
- Video files are usually harder than photos because interrupted recording can leave them structurally broken even when the raw chunks still exist.
What I’d do is make a disk image first if the card is at all unstable, then scan that image with Disk Drill. That keeps stress off the original card and gives you a repeatable recovery source. After that, sort recovered files by type and size because recovered media names/folders are often a mess.
One more practical thing: compare recovered RAW/JPG/MP4 file sizes to what your camera normally creates. Tiny files often mean broken recoveries. People miss that and think they’re done.
If you want extra reading, this thread has practical corrupted SD card recovery tips that are actually useful.
If the shoot was paid work or irreplaceable family stuff, I wouldn’t do 15 diff recovery attempts. One careful pass, maybe two max, then pro lab. Thats usually the line.

I’m with @byteguru and @sonhadordobosque on one thing: treat the card like evidence, not a gadget. But I’ll push back a bit on the “try repair checks” angle from @mikeappsreviewer if the files matter. Even light repair attempts can reshuffle metadata on camera cards.
What I’d add that hasn’t been stressed enough: check whether your camera wrote duplicate media structures. Some brands create hidden index or clip databases that recovery apps can use to rebuild folder context better than a blind file carve. If you see folders like DCIM, PRIVATE, AVCHD, MISC, don’t clean them up manually.
Disk Drill makes sense here mostly because imaging the card first is the safest play.
Pros of Disk Drill
- Can create a byte-level image before recovery
- Good at finding common photo/video formats
- Easier to use than a lot of recovery tools
Cons of Disk Drill
- Deep scans can be slow
- File names/folders may not come back intact
- Full recovery usually needs the paid version
One more practical tip: if recovered videos won’t play, don’t delete them. Some are only missing container metadata and can still be repaired later.
If the card reads with wildly wrong capacity, disappears during imaging, or slows to a crawl, skip more DIY. That is when pro recovery is worth it. Also, retire the card even if recovery works. A camera card that errors once during a shoot has already failed the trust test.